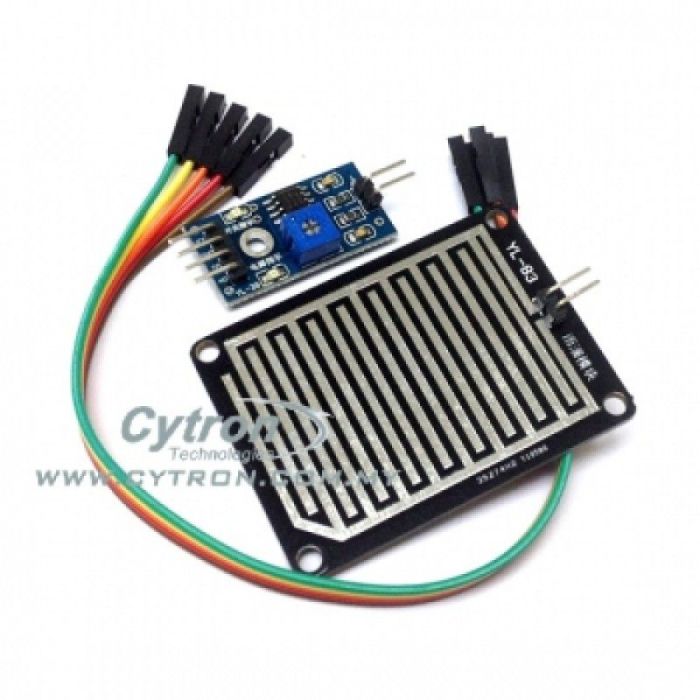
Rain Sensor Module
This is a resistive rain sensor. It operates on the principle of changing resistance due to the presence of water or raindrops on the sensor's surface. The sensor plate has parallel PCB tracks that are not connected. When water or raindrops come in contact with the surface of the plate, it forms a conductive path between the tracks, effectively reducing the resistance between them.
The resistance between the tracks decreases with the amount of water on the surface. As more water/raindrops accumulate on the sensor, the resistance continues to decrease. By using a simple resistor network and voltage divider circuit, you can convert this varying resistance into an analog voltage output.
The module comes with a comparator and adjustable potentiometer for user to adjust the threshold to toggle digital output. You can choose to use the digital or analog output.
Using a rain sensor with a Raspberry Pi or Arduino is a popular and straightforward way to incorporate rain detection into your projects. Both the Raspberry Pi and Arduino are versatile platforms that allow you to interface with various sensors, including rain sensors, to build weather monitoring systems, automated irrigation controllers, and more.
Below, we have provided a general guide on how to connect and use a rain sensor with both Raspberry Pi and Arduino.
Materials Needed:
- Raspberry Pi (any model with GPIO pins)
- Rain sensor (e.g., resistive rain sensor with two PCB tracks)
- Breadboard and jumper wires
- Optional: Analog-to-digital converter (ADC) if the rain sensor provides an analog output and your Raspberry Pi doesn't have an ADC built-in.
Instructions:
- Connect the rain sensor to the Raspberry Pi's GPIO pins or ADC following the sensor's datasheet or manufacturer's instructions. For example, if using a resistive rain sensor, connect its two PCB tracks to specific GPIO pins or ADC channels on the Raspberry Pi.
- If using an analog rain sensor and your Raspberry Pi doesn't have an ADC built-in, you can use an external ADC module to convert the analog signal to a digital value that the Pi can read.
- Write a Python script to read the rain sensor's data. For digital rain sensors, you can simply read the state of the GPIO pin. For analog sensors, you'll need to use the ADC library to read the analog value.
- Depending on your application, you can set a threshold value for rain detection. For example, if the analog value or GPIO state crosses a certain threshold, you can consider it as rain detected.
- Implement your desired action based on the rain detection, such as sending a notification, activating an irrigation system, or recording data for weather monitoring.
Materials Needed:
- Arduino board (e.g., Arduino Uno, Arduino Nano)
- Rain sensor (e.g., resistive rain sensor with two PCB tracks)
- Breadboard and jumper wires
- Optional: Analog-to-digital converter (ADC) if the rain sensor provides an analog output and your Arduino board doesn't have an ADC built-in.
Instructions:
- Connect the rain sensor to the Arduino board following the sensor's datasheet or manufacturer's instructions. For example, if using a resistive rain sensor, connect its two PCB tracks to specific digital or analog pins on the Arduino.
- If using an analog rain sensor and your Arduino board doesn't have an ADC built-in, you can use an external ADC module to convert the analog signal to a digital value that the Arduino can read.
- Write an Arduino sketch (program) to read the rain sensor's data. For digital rain sensors, you can use the digitalRead() function. For analog sensors, you'll need to use the analogRead() function.
- Depending on your application, you can set a threshold value for rain detection. For example, if the analog value or digital pin state crosses a certain threshold, you can consider it as rain detected.
- Implement your desired action based on the rain detection, such as activating a relay for an irrigation system, displaying the status on an LCD, or sending data to a computer or cloud service.
- Easy to Use
- power supply: 3.3V to 5VDC
- Come with jumper wires, 5 ways, female to female
The sensor plate has 2 PCB tracks which are routed in parallel surrounding it. These tracks are not connected, but when water / rain drops fall on to the surface of plate and change the resistance between the tracks because water / rain is a conductive, this further changes the resistance between tracks and reduces the resistance. The more water / rain that touches the plate, the resistance become lower. Using simple resistor network and voltage divider, you will get analog voltage output.
